Wednesday, May 14, 2014

3 Ingredient Ice Cream Sandwiches

As we all know, I love my desserts! So on my journey to living a clean, healthy lifestyle, one thing I vowed I wouldn't give up is my desserts! I just have to get creative and find a clean, healthy way to enjoy them!!

If you're at all like me and ice cream is what you crave in the heat, then skip the hundreds of calories and cholesterol you'll find in that cup or cone and make these delicious {and clean!} treats instead.


This dessert is completely dairy-free, contains no added sugar, and tastes like an ice cream sandwich. It's soon to become your new favorite healthy treat — and all for under 100 calories.

Best of all, they couldn't be easier to whip up and contain only three ingredients: organic graham crackers, ripe bananas, and all-natural peanut butter. Once the creamy filling is frozen, it takes on the consistency of ice cream.

You will need:


*12 Graham Crackers {we used Annie's Organic ones}
*2 ripe bananas {organic}
*2 TBSP peanut butter {could use almond butter or PB2 also!}


1.)  Cut bananas in half, place in bowl with peanut butter.  Mash together with a fork until smooth.
{I found that using a potato masher also worked great!!}


2.)  Break graham crackers in half so you have squares.


3.)  Spread the banana/PB mixture on the graham cracker squares. Place the other half of the cracker over top to make a sandwich.


4.)  Wrap individually & freeze for 6-8 hours before serving!


Wednesday, September 11, 2013

Hot Chocolate Cupcakes

As soon as the weather starts changing here in MI, I start craving my favorite thing...HOT CHOCOLATE!  I love everything about it and usually drink it from the start of fall until the start of spring!

This is basically the same thing as the Betty Crocker Hot Chocolate Cupcakes (the boxed mix)...which I have also tried..but sadly it's only seasonal!

Hot Chocolate Cupcakes


You will need....
  • 1 box chocolate cake mix {prepared as directed} OR your favorite Chocolate Cake Mix
  • Jet Puffed Mini Marshmellows  {the kind for hot chocolate}
  • 1/2 cup butter {@ room temp}
  • 1 cup marshmellow fluff
  • 2 cups powdered sugar
  • 2 tbsp milk
For the cupcakes...
    1.) Preheat oven to 350° 
    2.) Line 2 muffin tins with cupcake liners {24 cupcakes}
    3.)Prepare cake mix according to package instructions
    4.) Add Jet Puffed Mini Marshmellows to cake batter {I don't usually measure out a certain amount...you can add as many or as little as you'd like!}
    5.) Fill liners 2/3 full
    6.) Bake approximately 18 minutes, or until toothpick inserted in centers come out clean.  Cool 10 minutes on wire racks;  Remove from pan and cool completely.
    7.) Prepare frosting:

Marshmellow Buttercream Frosting {click to print}
the ingredients from above that you will need are: 
1/2 cup butter @ room temp
1 cup marshmellow fluff
2 cups powdered sugar
2 tbsp milk

How to make:
1. Mix butter and fluff on medium speed until smooth.
2. Slowly add in powdered sugar with mixer in low.
3. Add in milk and turn speed up to medium.  Mix until all combined and smooth
4. Frost cupcakes!

    8.) Once cupcakes are cool to touch, pipe frosting onto cupcakes!
    9.) Enjoy!!


Friday, August 9, 2013

Buffalo Chicken Cups

I was on my way home from work and wanted something quick & easy to make for dinner...but something that would be fun to make too!!  Then I remembered my husband had picked out a Buffalo Chicken cup recipe not long ago, so I figured I'd give that a try!! 


You will need...
  • 1 (8 ounce) package cream cheese, softened
  • 1/2 cup Ranch dressing
  • 1/2 cup Buffalo wing sauce (we used sweet baby ray's)
  • 1 cup shredded cheddar cheese
  • 1 1/2 cups cooked and shredded chicken
  • 24 wonton wrappers
  • 1/4 cup blue cheese crumbles (I did not use the blue cheese crumbles)

Preheat oven to 375 degrees.  Spray your muffin tins.

In a medium bowl, combine softened cream cheese, Ranch dressing, wing sauce and 3/4 cheddar cheese (save remaining 1/4 cup for topping). *You can soften the mixture slightly in the microwave if needed to make it come together. Stir in shredded chicken.

To start layering your cups begin with a wonton wrapper and press it into the bottom of each muffin tin. Spoon about a tablespoon of the chicken mixture. Top with another wonton wrapper and add another tablespoon of chicken mixture. Sprinkle with remaining cheddar cheese and a little blue cheese.


Bake for 18 minutes or until edges are brown. Check cups after 10 minutes into cooking and if edges are browned cover the cupcakes with foil for the remaining cooking time. 

Remove from oven and let cool for 5 minutes. To remove, use a knife to loosen the edges then pop each cup out.


Monday, July 15, 2013

S'mores Cups

Although I still think that my favorite S'mores Treat is my S'mores Cupcakes, these yummy S'mores Cups come in a close second!  They are a little more like the traditional S'mores...just a little less messy!


{Photo Credit: Pinterest}


S'MORE CUPS
You will need...
• 7 whole graham crackers, finely crushed
• 1/4 cup powdered sugar
• 6 tbsp butter, melted
• 4 bars milk chocolate candy
• 12 large marshmallows


Preheat oven to 350. Place graham crackers into a large resealable plastic bag. Finely crush into crumbs. Combine graham cracker crumbs, powdered sugar and butter in small bowl. Mix well with fork.

Place small scoop of crumb mixture in each cup of a mini-muffin pan. Press crumbs to form shallow cups. Bake 4-5 minutes or until edges are bubbling

While the crust is in the oven, break two of the candy bars into rectangles. Remove pan from oven; place one rectangle into each cup.

Cut marshmallows in half crosswise using shears dipped in cold water. Place one marshmallow half, cut-side down, into each cup. Return to oven 1-2 minutes or until marshmallows are just slightly softened. Remove from oven; cool 15 minutes. Carefully remove cups from pan. Cool completely.

Break remaining candy bars and place in (1-cup) prep bowl. Microwave on HIGH 1 minute-1 1/2 minutes or until melted and smooth, stirring every 20 seconds. Dip the top of each marshmallow in melted chocolate. Turn top-side up and let stand 40 minutes-1 hour or until set.

Yield: 24 cups
You can store in an airtight container for up to 1 week....but I really doubt they'll last that long!


Monday, July 8, 2013

Bacon Egg and Cheese....Cupcakes??

...Yes Please!!!
I have never been a big breakfast fan...yet I LOVE breakfast foods! {Go figure, right!?}  I have been trying to eat healthier... which is hard because I love my junk food!  And low carb is the hardest for me, but comes with the best results, so sometimes its necessary.  I've found that making things that I can eat on the go, helps me to eat a healthier breakfast.  Most times that ends up being a yogurt at my desk at work, which gets boring!

That's where these delicious Bacon, Egg {and cheese} Cupcakes come in!  I love everything in cupcake form, so when I got wind of these, it was a must try!  These are super easy to make, and depending on how you make them they can be low fat/calorie/carbs too!

Bacon & Egg Cupcakes 


You will need...

  • 12 slices bacon
  • 8 eggs
  • 1/2 cup shredded cheddar cheese
  • pinch of salt
  • 1/4 tsp black pepper 


Preheat oven to 350 degrees.
Whip the eggs, salt, pepper and cheese with a fork. 


Spray non stick spray in 12 muffin tins. 
Wrap each piece of bacon inside the sides of each muffin cup. 


Fill each bacon lined muffin cup 3/4 of the way with the egg mixture. 


Bake for 30-35 minutes, until the egg cups are golden brown and don’t jiggle. 
Use a knife to scoop them out of the tins. 
Serve immediately.

Monday, August 27, 2012

What a week!

This has been such a crazy, busy, hectic week!  With the kids going back to school in T- 1 week {yay!!} we've been busy back to school shopping, registration and desperately trying to fit in a few last minute things that we totally forgot to do since summer just seemed to fly by!!

With spending so much time thinking about what everyone else needs, I haven't taken much "me" time.  And it's wearing on me...I can't sleep anymore!!  So today, since I didn't have to work, I decided to take my "me" time!!  And what better way to spend it than baking my favorite thing in the whole world...cupcakes!?  There IS no better way!

And let's just say that I am so happy I did because 1.}I feel more like ME; and 2.}I made some wonderfully awesome cupcakes, that you just have to try!

Introducing...

I just used a box mix for the cupcake itself...but each cupcake has a mini Reese's surprise inside!!  Each cupcake has a very generous topping of peanut butter frosting {see recipe for suggested amounts} and is then topped with 1/2 a mini Reese's on each cake.  In the picture shown above, I decided to get creative and try to chop some extra cups I had left over...but failed to remember the peanut  butter in the middle...let's just say, they don't chop well!


I also decided to make some mini-cupcakes... those don't have any Reese's in them, just the peanut butter cream frosting...and they are still delicious!!!


Gourmet Reese’s Peanut Butter Cup Cupcakes  {print recipe here}
  • 1 box (18 oz.) chocolate cake mix {prepared as directed}
  • 1 (12 oz bag) Reese’s miniature peanut butter cups, unwrapped
Peanut Butter Cream Frosting: The original recipe I had called for twice this, but it was way to much!
  • 1/2 cup butter, softened
  • 1 cups Creamy Peanut Butter
  • 2 cups powdered sugar
  • 3 Tablespoons milk, or more if needed
To make the frosting: 
  1. Place the peanut butter and butter into a large bowl.  Beat with a mixer until well blended
  2. Add half the sugar and half the milk to the butter mixture.  Mix until blended.
  3. Add the remaining sugar and milk.  Mix until blended and the beat with mixer for 3 minutes until nice and fluffy.  Add more milk if needed to received desired consistency.
To make the cake:
  1. Preheat oven to 350°. Line two 12-cup muffin pans with cupcake liners; set aside.
  2. Prepare cake as directed.  Place one scoop {I use an ice cream scoop} into each cupcake liner.
  3. Place one Reese’s peanut butter cup into the center of each cupcake.  Press the peanut butter cup into the batter so 2/3 of the peanut butter cup is covered with batter.  The peanut butter cup will sink further in the cupcakes as it cooks. The original recipe I found called for you to push the cupcake into the batter, I don't suggest doing this.  It sinks down just fine by itself!
  4. Bake 18 minutes or until toothpick inserted in centers comes out clean. Cool 10 minutes on wire racks; remove from pans and cool completely.
  5. Pipe frosting onto cooled cupcakes.  Cut remaining peanut butter cups in half.  Place 1 half on top of each cupcakes.

I'd say I had a pretty successful "me" time today, wouldn't you?


Friday, August 10, 2012

National S'Mores Day!

My oldest son has been BEGGING to make S'mores lately, but we just haven't been having many fires in the backyard because it's been so hot!  He was willing to go for a microwaved S'more, but  they just don't taste the same!!  So when I heard it was National S'Mores Day, I just knew I had to come up with something so we could enjoy them!

Introducing...

First, give your cupcakes a graham cracker crust

Then bake your cupcakes.  I just used a chocolate cake from a box, but you can substitute it for your favorite chocolate cake mix if you want.


After your cupcakes have cooled, get your milk chocolate ready and spread it over top of each cupcake.  Refrigerate cupcakes to harden the chocolate.

While your cupcakes are in the refrigerator, whip up some marshmellow frosting to top your cupcakes with.

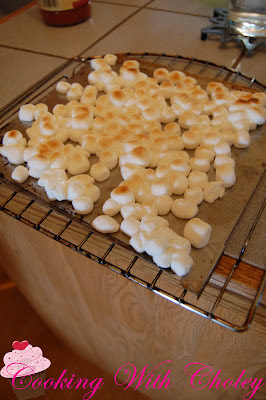
Once frosted, your ready to garnish your cupcakes!!! If you have any left over chocolate, reheat and drizzle over the top of the cupcakes. Then top with toasted mini-marshmellows!

NOTE: Marshmellows  cook VERY fast!! Make sure to have the oven mitt ready so you can take them out right away...if you don't, they'll look like this:

Let's try that again...this time with the oven mitt in hand! 


And now your ready to enjoy!!!


S'mores Cupcakes {click here to print recipe}
Makes 24 Cupcakes 

Ingredients 
  • 1 box chocolate cake mix, batter prepared according to package directions 
  • 1 1/2 cups crushed graham crackers 
  • 1/4 cup sugar 
  • 5 Tbsp butter, melted 
  • 5-6 full sized Hershey‘s Milk Chocolate Bars (1.55 oz each) 
  • 2 cups mini marshmallows, for garnish 
  • double batch Marshmallow Buttercream*:
Marshmellow Buttercream Frosting {click to print}
Ingredients
1/2 cup butter @ room temp
1 cup marshmellow fluff
2 cups powdered sugar
2 tbsp milk

How to make:
1. Mix butter and fluff on medium speed until smooth.
2. Slowly add in powdered sugar with mixer in low.
3. Add in milk and turn speed up to medium.  Mix until all combined and smooth
4. Frost cupcakes!


1.) Preheat oven to 350° 

2.) Line 2 muffin tins with cupcake liners, 24 Cupcakes 

3.) ln a medium bowl combine graham cracker crumbs, 
melted butter and sugar. Drop tablespoon amount of graham
cracker mixture into each liner and press down to form crust.
3.) Bake the crusts for 5 minutes and transfer to Wire rack.
4.) Prepare cake mix according to package directions. Fill 
liners 2/3 full. 

5.) Bake  minutes, until cupcakes are set. 

6.) Break Hersney's bars into small pieces and melt in 
microwave, 30 seconds on 50% power, stirring after every 30 
seconds. Repeat until melted. 

Spoon a tablespoon amount of chocolate on top of each 
Cupcake, spreading to cover. 

7.) Chill Cupcakes in fridge until Chocolate is set. 
8.) Make a double batch of Marshmallow Buttercream 

9.) When chocolate is set, frost cupcakes. 

10.) Drizzle with remaining Chocolate, if desired. (you might
need to reheat) 

11.) To toast marshmallows, spread marshmallows on a 
baking sheet. Turn oven to broil. 

12.) When oven is ready, place baking sheet on top rack.
Toast marshmallows under broiler for 15 SECONDS. They 
toast VERY quickly, so stay Close. 

13.) Remove from oven and garnish cupcakes.

*I did not make a double batch of the marshmellow buttercream frosting and was still able to decorate all 24 cupcakes, but I would suggest making a double batch so you have more to work with!